Registering a Student in Aspen Go
If your child is not currently enrolled at a school in this district (for example, you moved, or your child attended private school or was home-schooled), you can register them using your phone or mobile device.
To register your student:
-
Log on to Aspen Go.
-
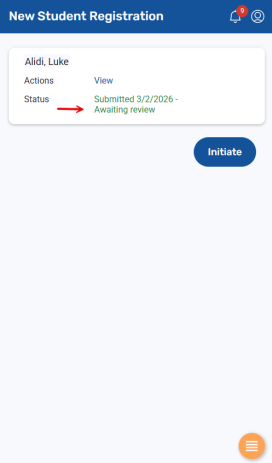
Tap New Student.
-
Tap Initiate. The New Student Registration Start screen appears. The name of each tab, or screen, that you will review appears at the top.
-
Select the school year you are registering the student for, and then tap Next. The Student Information screen appears.
-
Enter your student's information on each screen, as described below.
-
On the final tab, tap Submit. The district can review the registration and will follow up with you.
|
Notes:
|
Registration Form tabs
Start tab
-
Tap the school year you are registering for.
-
Tap Next.
Student tab
This screen is broken up into several sections.
-
Student Information: Enter your student's legal first, middle, and last name. This information should match their birth certificate. If the student doesn't have a middle name, select the No middle name checkbox. You can enter an alternate name at Preferred Name.
-
Birth and Citizenship: Enter the student’s city and country of birth, and other information.
-
Age and Grade Level: Enter your student’s date of birth and grade level.
-
Ethnicity and Race: Select all that apply.
-
Phone Information: Enter the primary phone number(s) associated with your student.
-
Address Information:
-
Physical address: Tap Add to enter the student's home address (required).
-
Mailing address: Enter only if different from physical address. If you answer No at Mailing address same as physical, tap Add to enter the student's mailing address.
-
-
Housing/Residence: Tap each question to make your selection, and then tap Next.
School tab
You might be asked to select a school here, or review information about how your district assigns students to schools. Tap Next.
Family/Contacts tab
Parent/Guardian/Other Contact
Enter contact information for the people who should be notified in case of school closure or other urgent issues. At least one parent or guardian must be entered.
-
If you are the primary contact, your name appears. Tap it to review and complete your information.
-
Tap Add to enter another contact's name and relationship to the student.
-
If this contact should be allowed to view the student's academic, attendance, and other information in the portal, tap Yes at Allow portal access.
-
To indicate the first person the school should contact, enter 1 at Contract Order/Priority. You need to enter at least one phone number for the student's primary contact.
-
Answer the Contact Questions.
-
Enter a physical and mailing address for the contact. These fields are optional for contacts who do not have custody of the student.
-
To enter another contact for the student, tap Add and repeat the steps.
Legal Information: Tap to select your responses. You may need to provide copies of related documents to the school.
Siblings: The name(s) of sibling(s) who attend school in the district appear.
-
Tap a name to review the information.
-
Tap Add to enter another student, if needed.
-
Tap Next.
Additional Info tab
This tab contains other information collected by your district. Select your responses, and then tap Next.
Language tab
Tap to enter information about the language(s) the student and family speak. Tap Next.
Health tab
Tap to enter the student's health and medical information. Tap Next.
Services tab
Tap to enter information about any special education support, disability accommodations, or social and emotional health services for your child. Tap Next.
Documents tab
Families are required to submit documents to prove residency in the district. Your district accepts the documents listed, and might ask you to bring these and/or other documents to school in person.
It can help to upload documents beforehand. To do so:
-
Tap Add.
-
Type the document's name.
-
Select the Type of document.
-
Tap Choose File.
-
Tap the file, and tap Open.
-
Tap Upload.
-
Repeat these steps for each document you want to upload. When you are done, tap Next.
Submit tab
On the final tab:
-
Type any additional information you want the registrar to review.
-
Tap each tab, check the information you entered, and edit as needed.
-
When you are done, tap Submit.
The registrar can review the information you submitted and will contact you.
|
Note: You can click the New Student tab to check the registration's updated status.
|